Friday, December 16, 2011

Creamy Caramel Flan

My mom loves Flan, I mean LOVES it. She was known to eat only a garden salad at dinner so she could order 2 flan servings for dessert. I tried it from several Mexican places and was not impressed by the texture. It just simply was not that good, sometimes a little chunky or spongy, and as someone very texture sensitive it even worse. I am more of a cheesecake person myself, so I needed a smoother, creamy texture (envision caramel cheesecake that is just a little ore solid than custard or pudding).

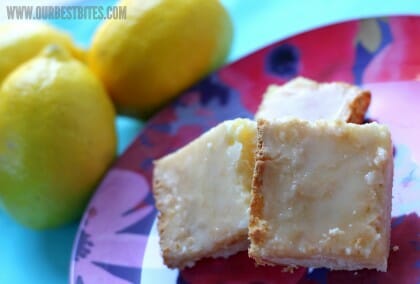
The only time I really could say that I really liked flan, was back in college when a friend and I made his mom's recipe. She is Columbian and her recipe involved putting all the ingredients in a blender (genius I tell you, no other recipe for flan is as easy as doing that). We baked it in a water bath, cooled it overnight, it turned out pretty spiffy.


I went to make it on my own a few years later as part of a Mexican dinner for some family. I stumbled upon a recipe on allrecipes.com called Creamy Caramel Flan. I make use the directions from my friends mom, and the recipe from this one. Enjoy, it sounds complicated, but it really isn't, and it is a perfect dessert to make ahead of time. As it needs to cool at least 8 hours before serving. It is also an awesome dessert because the ingredients are easy to keep on hand. Bonus it is gluten free, which dessert wise is very uncommon.

Bold=My directions

Creamy Caramel Flan

Ingredients

  • 3/4 cup white sugar
  • 1 (8 ounce) package cream cheese, softened
  • 5 eggs
  • 1 (14 ounce) can sweetened condensed milk
  • 1 (12 fluid ounce) can evaporated milk
  • 1 teaspoon vanilla extract

Directions

  1. Preheat oven to 350 degrees F (175 degrees C).
  2. In a small, heavy saucepan over medium-low heat, cook sugar, stirring, until golden. Pour into a 10 inch round baking dish ( I use an 8" by 8" because I find it fits nicely into a 9" by 13" pan which will get use as a waterbath in the baking process), tilting to coat bottom and sides. Set aside. (If the caramel cracks dont worry it will melt again while baking
  3. In a blender combine everything but the sugar (which was made into caramel) and pour into the 8" by 8" pan, place that pan into a 9" by 13" 1/3-1/2 filled with water. Place in the oven. 
  4. Bake in preheated oven 50 to 60 minutes, until center is just set. Cool one hour on wire rack, then chill in refrigerator 8 hours or overnight. To unmold, run a knife around edges of pan and invert on a rimmed serving platter.


Thursday, December 15, 2011

Peanut Butter Fudge

My mother-in-law retired this summer and has relished finally having the time to experiment with various Christmas candy recipes. Our waistlines are showing the affects of her efforts. I myself usually do not care for things like Tofee, Divinity, Almond Bark, Chocolate Fudge etc. However her Peanut Butter Fudge is amazing. I seriously ate almost all of what she gave me the very first night we had it at home. I asked her for the recipe, something I now regret now that half a nine by thirteen is gone. So if you have immense self control, or are actually capable of giving away deliciousness, go ahead and whip up some of these bad boys.


PEANUT BUTTER FUDGE

2 c. sugar
1/2 c. milk
1 1/3 c. peanut butter
1- 7 oz. jar marshmallow creme

Line a 8" by 8" with foil and then lightly butter the foil.  Set aside.  In a saucepan, bring sugar and milk to a boil on medium heat, stirring constantly.  Boil for 3 minutes and continue to stir.  Remove from heat and add peanut butter and marshmallow creme.  Mix well and quickly pour into the buttered pan.  Chill until set.  

Tips as provided by Sherri Freestone

"I doubled this recipe and it filled one of my LARGE cookie sheets. The recipe says to use an 8x8 pan, but if you make a single batch I think I would put it in a 9x13.  The 8x8 pieces would be super thick.  Use the heaviest saucepan you have and stir it with a wooden spoon (me- C. suggests a silicone spatula instead).  As you stir, try to keep it scraped from the sides so that it doesn't crystalize there. Instead of putting it in the fridge to chill, I set it on the floor of the cold garage. :)   Another trick...  when it is cool, lift the whole thing out of the pan using the foil.  Place it on a cutting board and cut it into small squares with a pizza cutter.  I'm making it sound hard, but it is super easy and simple...."

YUMMMMMMY


Mr. B etc.


Toddlerness is in full swing at our house. Mr. B is into everything, and insists that all attention be 100% dedicated to him. He likes to spend his days ransacking cupboards, dumping drawers, and attempting to steal and break our electronic devices. When these activities get boring he reads some books, dances to any music he hears (and sometimes does not hear) and resisting sleep. For example yesterday he got ahold of powdered eye shadow, and in less than two minutes this was the result.


I spent yesterday preparing some Mexican food for G's mission president and his wife (he served in Mexico City so they stakes of authenticity were pretty high). Not wanting to get too over my head I made from scratch refried beans, mexican rice, carne asada tacos (mexican style steak tacos, and my signature creamy flan. Aside from a placing on the plate mishap that left the flan with an ugly blemish on the top, everything was perfect. The flan tasted so amazing that the guests were speechless. I had not known that his mission president having served in Argentina had grown to love their creamy flan and missed it terribly (mexican flan is not nearly as creamy), so that worked out awesome.


As a part of making the beans, I cooked up a batch of bacon (you cook the beans in their grease). I set the bacon on the kitchen table. Mr. B not content with the tiny piece I had given him, reached from his high chair, pulled the table runner until the entire plate of bacon was on his tray. I walked over and saw this mischievous smile.


If you want to make your own mexican feast you can use these recipes:

Creamy Caramel Flan- allrecipes.com, although make sure to just put all the ingredients in a blender, it is the easier way to make it

allrecipes.com Mexican Rice II


Refried Beans- Homesicktexan. blogspot.com


Monday, December 5, 2011

Baked Potato Heaven


Just after high school I worked at a restaurant that made a delicious Baked Potatoe Soup. I craved it for years after working there. Finally as a newlywed I combed through various allrecipes.com for a recipe that would taste similar. I made one, liked it buy found it cumbersome. I played around over the years trying to find one that I could make in my crockpot. Finally I found one at http://www.mamalovesfood.com/2009/06/baked-potato-soup-slow-cooker-style.html. I used it as my guide (if it does not involve baked goods I rarely make something as written. I bet hers would have been delicious as written but I put my own spin on it, and man was it good.

Crockpot Baked Potato Soup: (yields 5 quarts, or enough to feed 7 adults)

5 lb bag of potatos, peeled and cubed
8oz block cream cheese (I used fat free and it worked great)
1/2 cup sour cream ( I also used FF)
9 cups chicken broth (I used a product called Better than Bouillon to make this)
4 tbs minced garlic (or garlic powder or the real deal)
2 tbs onion powder
1 tbs. Tony Sacherees Creole Seasoning (which includes: salt, red pepper, basil, oregano and thyme)
1 tbs. Salt
(additonal seasoning as desired)

Garnishes:
Crumpled Bacon (at least 1 cup for the whole batch)
2 cups Cheddar Cheese (or similar cheese)
Green Onions (if desired)

Cook potatoes in chicken broth for 6 hours on high, turn to low until 30 min before serving. When you are 30 min from serving take out 1/3 of the potatoes and broth and put it in a blender with the block of cream cheese and sour cream. Blend until liquefied. If their is not enough take out additional chicken broth from the crock pot). Return the creamed mixture to the crock pot. Season additionally as desired. Technically it is ready to serve, but I like giving it the extra bit of time to thicken up.

Serve with desired garnishes and enjoy :)

Special Note:
When reheating the soup, milk will need to be added to the soup to thin it, as it tends to thicken immensely after being refrigerated.


Friday, December 2, 2011

Cooking Up a Storm

The first night we were in our home as a family we got a hankering for some good ole fashioned chocolate chip cookies. For those of you who are unfamiliar with my family history regarding baking, basically my mom and mother in law are both experts at baking. Both make famously delicious crescent rolls. My mom is known for chocolate chip cookies and my mother in law makes a fruitcake that will make anyone change their mind about the stuff (its really really good).  

So basically I am a cookie snob (and a roll snob, but I can't seem to make those on my own yet). I have finally found (okay so my sister found it) a chocolate chip cookie recipe that is mine and G's personal favorite. Behold yummyness:


Well this baking/ eating yummy treats urge hit again yesterday. So I made another ourbestbites gem.


They are unique lemon bar wise because they have a glaze instead of the classic sugar on top. This basically means that you get the same sweetness but none of the choking or gagging on powdered sugar when you inhale these bad boys.

I made these before and overcooked my crust, while the filling was undercooked. I was able to remedy this problem by lowering the oven temp to 340 this allowed me cook the filling long enough with out burning the shortbread crust. I also added extra lemon juice because I love mine a little stronger.

To round out my baking madness I made an additional batch of cookies. For these I made my staple favorite Oatmeal Cookies. Sadly I forgot to let the dough completely freeze before making them, meaning I was left with pancake cookies. The dough tasted phenomenal and so did the finished cookies, they just won't be winning awards for looks anytime soon. If you have a hankering for cookie dough this dough is great one to keep in the freezer (if you dare).


Happy Baking :)

Wednesday, November 30, 2011

Barren Walls

We are happy to report that we are all moved in (we unpacked our last box yesterday). We even put up our Christmas decorations, which have made my kitchen and part of my family room look very festive. Nonetheless we still have a terrible case of barren walls, wall screaming for a decorators touch. Sure we have wall hangings that we used at various apartments, but the thought of putting them up for good in our home has us standstill. Pinterest has left me with many ideas, so many in fact that I have no idea which to use or where to put them.

Exhibit A:  The huge empty wall behind our TV, any suggestions?


Exhibit B: Equal sized walls on either side of our family room window? I imagine window treatments would help, but alas I have no idea what kind.


Exhibit C: Here we want to put a huge fancy picture of the Salt Lake temple and maybe a wedding photo on each side, but other than that we are drawing a blank.


Exhibit D: We don't own a headboard and we have no idea what would look nice in a master bedroom.


Exhibit E: A wall in our master bedroom, here I was thinking of displaying a cool pattern of mirrors, I picked  up two cheap packs of small frameless mirrors at ikea awhile back, but I am not sure what design to use for them.


So yeah, we would love any and all creative input :) In case you missed our facebook post, here is our kitchen for good measure.


And here is Mr. B atop the stairs (just in case you wanted to admire the carpet and his cute smile).

Sunday, November 13, 2011

Fall Fun

So I have pretty much been turning green with jealousy every time I see someone's fall family pictures. I just cannot get over the super cute kiddos playing in the leaves and the pretty fall colors. Well thanks to my gracious sister of Michelle Lea Photography, our family finally has some cute pics of our own. Now you will have to pardon our lack of photogenicness, we find it pretty hard to look good whilst trying to make our squirmy toddler sit still long enough for a picture. If you live in Utah Valley or Denver she would love to take some more.


Saturday, October 29, 2011

Halloween Treat Fun

My absolute favorite Halloween treat (okay anytime treat) is popcorn balls. Not the caramel kind, or the really hard ones that almost break your teeth off. Rather I like them soft and chewy just like my mom use to make/makes for me when I am at her house. They are incredibly delicious and pretty simple and quick to make. The only problem with them is that they are so delicious that I cannot stop eating them. I am pretty darn sure I downed about 4 maybe 5 of them last night at the Halloween party that I took them to. Anyhow I thought I should share the deliciousness.

Okay so not everybody will be able to make these because they require an airpopper to make the popcorn you can use in the recipe (some people use other types of poppers but this is the kind I am most use to using). So if you decide you need to make some of these I would be happy to lend you my trusty 20 year old popper. I am pretty sure you could also pick up a second hand one for under 5 dollars.

Enough Popcorn For a Double Batch

Prep:
Begin by popping 2 large mixing bowls worth of popcorn (sift it through your fingers to remover kernals, I also throw out the smaller pieces if you want). 

Recipe:
Syrup Ingredients-
2 C.    White Sugar
1 C.    Light Caro Syrup
1/2 C. Butter
1/4 C. Water
4 Drops of food coloring (optional but highly encouraged as it helps you tell how well if the popcorn is being evenly coated with the syrup mixture). 

After Boiling-
2 t. vanilla


Put in a large pot and bring to a boil. Boil until it reaches a "soft ball" stage, 234 Degrees F. If you do not have a candy thermometer you can test if the syrup is done by dropping a spoonful in ice cold water and if it turns into a soft stringy ball (you will actually have to put your hand into the cup and feel the syrups consistency). After this has occurred add 2 teaspoons vanilla and stir. You can now begin pouring the mixture into the mixing bowls of popcorn. I use a flexible spatula, and make sure to constantly scrap the bottom of the bowl so that the syrup does not just get stuck on the bottom of the bowl. 

Once the coated popcorn has cooled for 3-5 minutes you can begin shaping them into balls. Make sure to take off any jewelry and spray your hands with cooking spray to reduce the amount of syrup on your hands.
I either wrap them individually in wax paper or I set them on a cookie sheet covered in wax paper. 

Ta Daaaaa 
Delicious popcorn balls!


Mine looked identical to these (minus the awesome garnishing)

Wednesday, October 26, 2011

Cousins and California :)

I had not been out to Southern California since before G and I got married almost 3 years ago. In that my Dad had also not been out there to visit him Mom (my grandmother) I suggested we planned a trip together. So 2 weeks after we returned from Colorado Mr. B and I headed back to the airport and headed to Great Grandma's house.

Mr. B's grandpa was very smart and made sure that not only did Mr. B and I have nonstop flights, but he scheduled his flights so that he was waiting for us when we got there, and was able to see us off when we left. I was awesome to have his help as we got our baggage and on the way home he helped entertain Mr. B when our plane was delayed.

Our trip started on a Wednesday morning, the airport was pretty quiet and Mr. B was relatively well behaved there. We curb checked our bags, I put Mr. B on my back, breezed through security (thanks to family security lines, which I really wished the Denver airport had) and we strolled through the airport leisurely killing time.

Mr. was unimpressed by his binky, sippy cup and even a lollipop, leading him to find the descent miserable. He screamed 15 minutes before falling asleep for 1 minute. My little rascall considered that a nap, and went on to stay awake for another 2 hours. It was insane.

Mr. B had never met his Great Grandma, and he instantly became her friend, wanting to sit next to her.


We got to spend lots of time visiting with her, old friends, and my Aunts, Uncle and Cousins and their kids. We made sure to get lots and lots of pictures.


Monday, October 17, 2011

Summer Fun

Low and behold my camera decided to forgive my computer and they began speaking again. Okay so actually they just both decided that they like G. and his computer skills more than me. Anyhow I am so excited to finally have access to the pictures we have taken the last two months. Be prepared for a photo bomb.

Camping in Manti and Hanging out at the Zoo:


Denver Trip Part 2:

Having cousin time in Grandma B's playhouse.


 Grandma was awesome enough to get Mr. B all clean again. He though his sink shower was pretty nifty.


Last Week: Mr. B. ran a fever that left him much more cuddly and sleepy than usual.


So sleepy that 6pm was too late for him :)